Forum Contributor
- User ID
- 139
- Messages
- 172
- Reactions
- 1,400
- Level
- 71
Hi, the following tutorial will be about creating a no-recoil script for this game called Banana Shooter. (
1. step: Dumping GameAssembly.dll
First things first, you want to download il2cpp dumper from github. [
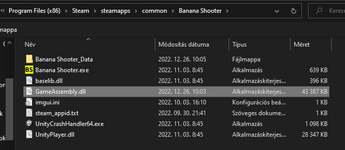
After opening it up, it will just open an explorer. You want to navigate to the game's directory, and select GameAssembly.dll. After you have selected that, the next thing you have to select is the metadata. This can be found inside the il2cpp_data folder, global-metadata.dat.
Examples below:
GameAssembly.dll

Data:

If you have done everything right, it will proceed. You will see a folder named "DummyDll" appear. This is where the DLL useful for us is located. If you want to make a more fully featured cheat, then the file "il2cpp.h" will be useful for you as well. This is not found inside DummyDll directory, but rather next to the exe. Don't get scared if this file is very big in size, it is meant to be big. For this tutorial we will not be using this file, as it isn't needed for something this simple.

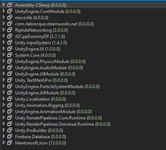
Now, you can go ahead and open "Assembly-CSharp.dll" found inside DummyDll in dnspy, as it's the easiest to work with in my opinion. Once you have done that, you should see this:

Click the arrow next to "Assembly-CSharp.dll", to get started. Now you can see all the interesting stuff you can do with this game. Yeah, you can do very broken stuff indeed. Anyways, we are here for recoil removal today, so let's get started on that. Now since i have some experience on this game, i know what you have to look for. In the search bar at the bottom, search for RecoilFir. This is what should show up:

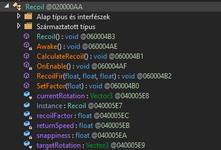
Double click on it. It will take us to the recoil class. Click the arrow, and you can see the whole class. This is how it should look like:

If we just purely look at the functions, we can guess that RecoilFir is the function handling our recoil, since it takes 3 floats (x,y,z). So, we should double click on RecoilFir.

This is what we will see. Now this since this isn't mono, we can't see the full source of it.
To achieve no recoil, we should hook this function, and then return to the original function with the params 0,0,0.
Now to hook this function, we need to use the "RVA" number as the offset. So the offset of RecoilFir (with current game update) is 0x3B8C60.
2. step: Coding the hook
We should start by creating a visual studio project, then creating DllMain. If you can't or don't want to do this, just use the Dll template when creating the project in visual studio. Once it loaded up, we should create a header file to stay at least a bit organized. I will call this includes.h, however this name is a bit misleading, since it wont just include our includes lol. Next thing, we should add minhook to the project, since that will be my hooking library of choice. [
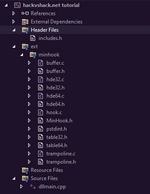
The project looks as following:

In includes, we include:
Windows.h, MinHook.h
Next thing we want to do, is create our namespace(s). If I wouldn't share this code I personally would use classes, but I feel like namespaces are less complicated lol. So, we want to create 2 namespaces:
-offsets (for storing our offsets)
-hooks (for storing hook related stuff)
To the offsets namespace, we want to add the offset of RecoilFir obviously.
This is how the offsets namespace looks like:

Now to the hooks namespace, we want to add all of our "original values" and detour functions. I will also create a hooks.cpp file, just to stay organized.
For the original values, we should create our typedef first. Typedefs are basically our way of describing, how that function actually looks like inside the game. I know this isn't the best explanation, but you can read more about it online if you are interested. Basically, the typedef for the RecoilFir function looks like the following:

Now, let me explain why it looks like this. The void right after the typedef keyword is the return type of the function. Since we looked at the function in dnspy, we know it return nothing, aka its a void. The __cdecl* is the calling convention. In C# __cdecl* is the calling convention. The next text is RecoilFirFN. This is the name for our typedef, feel free to change it to whatever you want to change it to, just remember it for later. The other stuff are the arguments of the function. Remember, we looked at it in dnspy and saw that it takes 3 floats. Now what is that void* then? That is known as thisptr, or self(ptr). This is a pointer to the base class, in this case to the Bullet class. If we were to include to the "il2cpp.h" file, we could replace that with Bullet_o*, however, since we don't need this class instance, we don't have to. TLDR; We have no use for it, but we have to pass it on. FYI: If the function was static, we wouldn't have to pass on the thisptr.
Now that we have our typedef, we can fill our hooks namespace.
This is how it should look like:

Our hRecoilFir is the detour function, it should also match the function we are detouring, so should have the same params as the function, and obviously we need to pass thisptr through.
Now in hooks.cpp we will create the body for these functions:

Now as i said, in Setup we want to setup minhook and our hooks, so let's do that.

Please don't forget to pass in oRecoil as a reference, since if you don't do that, it wont be able to edit that value, and it will stay nullptr, which obviously isn't good.
Now, time to create our detour function.
This is how it should look like:

Yeah, this post isn't really about a complicated module, but rather how to get started. After we have set-up all of this, time to make our main function. Let's head to dllmain.cpp.
In this file, we want to create a main function, and create a thread. If you want an unloading dll, which I would recommend if you plan to work on this game, I recommend creating an hooks: estroy method, and also some form of unloading it. If there is interest, I can do that next time.
dllmain.cpp

3. step: testing it
Time to build our project, and test if it works. For injecting, I will use extreme injector.
If you get this error, inline your variable:

Now if we head ingame, we can see, the we indeed get no recoil. [
I prob made many spelling mistakes, and have retarded wording, sorry, i'm a bit tired lol.
Hope this helps for some people, it feels nice to come back <3.
I also released the dll for anyone who wants to use it.
You must be registered for see links
) Main focus is to teach il2cpp basics for the ones who want to learn more in this direction, as this is a very basic thing to achieve.1. step: Dumping GameAssembly.dll
First things first, you want to download il2cpp dumper from github. [
You must be registered for see links
]After opening it up, it will just open an explorer. You want to navigate to the game's directory, and select GameAssembly.dll. After you have selected that, the next thing you have to select is the metadata. This can be found inside the il2cpp_data folder, global-metadata.dat.
Examples below:
GameAssembly.dll

Data:

If you have done everything right, it will proceed. You will see a folder named "DummyDll" appear. This is where the DLL useful for us is located. If you want to make a more fully featured cheat, then the file "il2cpp.h" will be useful for you as well. This is not found inside DummyDll directory, but rather next to the exe. Don't get scared if this file is very big in size, it is meant to be big. For this tutorial we will not be using this file, as it isn't needed for something this simple.

Now, you can go ahead and open "Assembly-CSharp.dll" found inside DummyDll in dnspy, as it's the easiest to work with in my opinion. Once you have done that, you should see this:

Click the arrow next to "Assembly-CSharp.dll", to get started. Now you can see all the interesting stuff you can do with this game. Yeah, you can do very broken stuff indeed. Anyways, we are here for recoil removal today, so let's get started on that. Now since i have some experience on this game, i know what you have to look for. In the search bar at the bottom, search for RecoilFir. This is what should show up:
Double click on it. It will take us to the recoil class. Click the arrow, and you can see the whole class. This is how it should look like:

If we just purely look at the functions, we can guess that RecoilFir is the function handling our recoil, since it takes 3 floats (x,y,z). So, we should double click on RecoilFir.

This is what we will see. Now this since this isn't mono, we can't see the full source of it.
To achieve no recoil, we should hook this function, and then return to the original function with the params 0,0,0.
Now to hook this function, we need to use the "RVA" number as the offset. So the offset of RecoilFir (with current game update) is 0x3B8C60.
2. step: Coding the hook
We should start by creating a visual studio project, then creating DllMain. If you can't or don't want to do this, just use the Dll template when creating the project in visual studio. Once it loaded up, we should create a header file to stay at least a bit organized. I will call this includes.h, however this name is a bit misleading, since it wont just include our includes lol. Next thing, we should add minhook to the project, since that will be my hooking library of choice. [
You must be registered for see links
]The project looks as following:

In includes, we include:
Windows.h, MinHook.h
Next thing we want to do, is create our namespace(s). If I wouldn't share this code I personally would use classes, but I feel like namespaces are less complicated lol. So, we want to create 2 namespaces:
-offsets (for storing our offsets)
-hooks (for storing hook related stuff)
To the offsets namespace, we want to add the offset of RecoilFir obviously.
This is how the offsets namespace looks like:

Now to the hooks namespace, we want to add all of our "original values" and detour functions. I will also create a hooks.cpp file, just to stay organized.
For the original values, we should create our typedef first. Typedefs are basically our way of describing, how that function actually looks like inside the game. I know this isn't the best explanation, but you can read more about it online if you are interested. Basically, the typedef for the RecoilFir function looks like the following:
Now, let me explain why it looks like this. The void right after the typedef keyword is the return type of the function. Since we looked at the function in dnspy, we know it return nothing, aka its a void. The __cdecl* is the calling convention. In C# __cdecl* is the calling convention. The next text is RecoilFirFN. This is the name for our typedef, feel free to change it to whatever you want to change it to, just remember it for later. The other stuff are the arguments of the function. Remember, we looked at it in dnspy and saw that it takes 3 floats. Now what is that void* then? That is known as thisptr, or self(ptr). This is a pointer to the base class, in this case to the Bullet class. If we were to include to the "il2cpp.h" file, we could replace that with Bullet_o*, however, since we don't need this class instance, we don't have to. TLDR; We have no use for it, but we have to pass it on. FYI: If the function was static, we wouldn't have to pass on the thisptr.
Now that we have our typedef, we can fill our hooks namespace.
This is how it should look like:

Our hRecoilFir is the detour function, it should also match the function we are detouring, so should have the same params as the function, and obviously we need to pass thisptr through.
Now in hooks.cpp we will create the body for these functions:

Now as i said, in Setup we want to setup minhook and our hooks, so let's do that.

Please don't forget to pass in oRecoil as a reference, since if you don't do that, it wont be able to edit that value, and it will stay nullptr, which obviously isn't good.
Now, time to create our detour function.
This is how it should look like:

Yeah, this post isn't really about a complicated module, but rather how to get started. After we have set-up all of this, time to make our main function. Let's head to dllmain.cpp.
In this file, we want to create a main function, and create a thread. If you want an unloading dll, which I would recommend if you plan to work on this game, I recommend creating an hooks:
dllmain.cpp

3. step: testing it
Time to build our project, and test if it works. For injecting, I will use extreme injector.
If you get this error, inline your variable:
Now if we head ingame, we can see, the we indeed get no recoil. [
You must be registered for see links
]I prob made many spelling mistakes, and have retarded wording, sorry, i'm a bit tired lol.
Hope this helps for some people, it feels nice to come back <3.
I also released the dll for anyone who wants to use it.
